DIY lifting platform

“You know what would be awesome? Dropping heavy weights on a custom wood floor!” Said no one, ever. Until now.
I’d like to practice Olympic lifts inside my house but I need a way to protect my floors and I don’t have room for a full lifting platform. What ever shall I do?
I decided to go the DIY route and build a simple lifting platform that fills this need and pass the knowledge on to you.
Disclaimer
I know it’s common in CrossFit and Olympic weightlifting to drop the weight from full height after a lift, but this platform is not suited for that purpose.
I’m practicing Olympic lifts, but I bring the weight down with control rather than dropping it after a lift.
I know this isn’t what the cool kids do, but I’ve got to be practical since my gym is in a spare bedroom of my home. I built this platform to protect my wood flooring from damage if I accidentally drop a weight, not intentionally drop a weight.
If you want to intentionally drop your weights after completing a lift, that’s awesome! But, you should use a dedicated lifting platform instead, and probably do it outside or in your garage.
Otherwise, don’t blame me if your floors get damaged ¯\_(ツ)_/¯
Materials & tools
I wanted something easy to move and take apart if necessary, mainly to be able to clean under and around it. I decided to use three pieces of 2’x4′ plywood laid down side by side, to make a 24 sq ft platform.
I used the following materials to make my platform, all purchased from Home Depot at a cost of $110 + tax:
- 3 sheets of 2′ x 4′ x 1/2″ sanded plywood.
- 24 sq ft of any thin carpet with a rubber backing (indoor/outdoor carpet works well)
- 24 sq ft of 1/2″ thick interlocking foam tiles
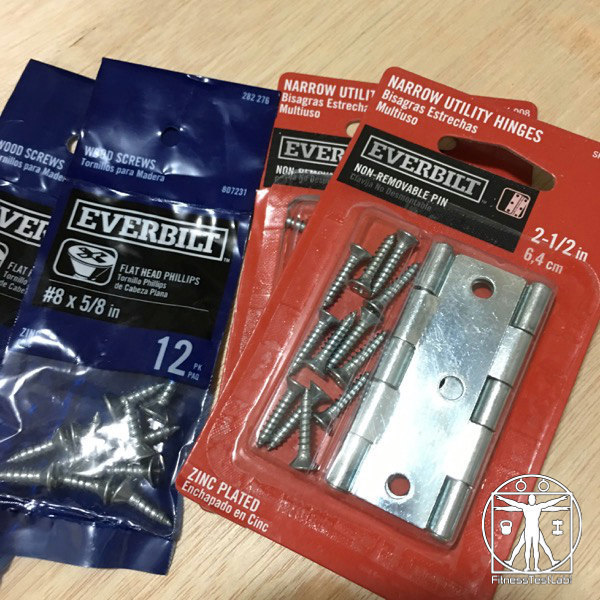
- 4 narrow utility hinges, 2-1/2″ wide
- 24 #8 x 5/8″ flat head wood screws
I chose 1/2″ thick plywood because that’s what was available at my local Home Depot, but you could just as easily use 3/4″ plywood if that’s available to you.
The carpet is the base layer that protects the flooring from being scratched by the plywood. I found a thin black indoor/outdoor carpet with a light rubber backing, which helps keep the carpet and platform from sliding around on the wood floor.
The plywood acts as a force distribution layer, which spreads the impact of a drop over a larger surface area. The foam tile mat helps soften the blow a bit and provides a cushioning layer for my feet.
Unhinged, but no screws loose
Depending on the brand, you might get some hinges with screws included. The ones that came with mine were too long to use in the 1/2″ plywood sheets I’m using, so I bought separate screws that were 5/8″ long.
In addition to the raw materials, I also used the following tools:
- Compact drill
- 7/64″ drill bit
- Oscillating multi-tool (one of the most useful tools I own!)
- Adjustable work bench (optional, but very handy)
- Phillips head drill bit
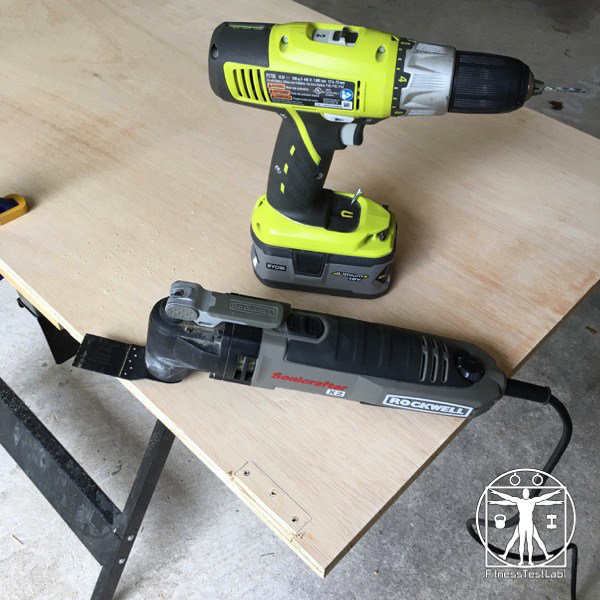
Gratuitous tool shot, in case you’ve never seen an oscillating multi-tool before
Version 1.0
My initial plan was to lay the sheets of plywood side by side on top of the carpet and cover the plywood with the foam tiles.
Simple, cost effective, and not very time consuming.
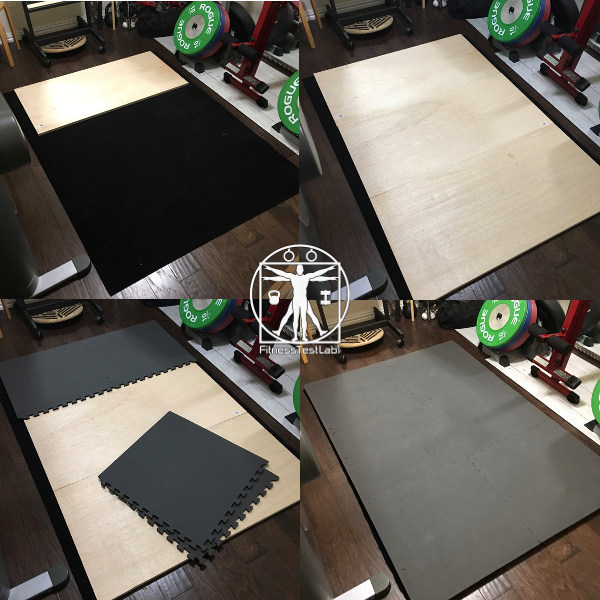
DIY lifting platform, v1.0
This idea worked, but the plywood sheets would shift slightly during workouts and I always had to readjust them afterward.
After a few days I decided I could do better, so I started thinking about connecting them.
Version 2.0
The simplest approach to connecting the plywood sheets would be to use flat mending plates.
However, using flat plates would have negated one of the key benefits I envisioned in the first place, namely the ability to easily move the platform.
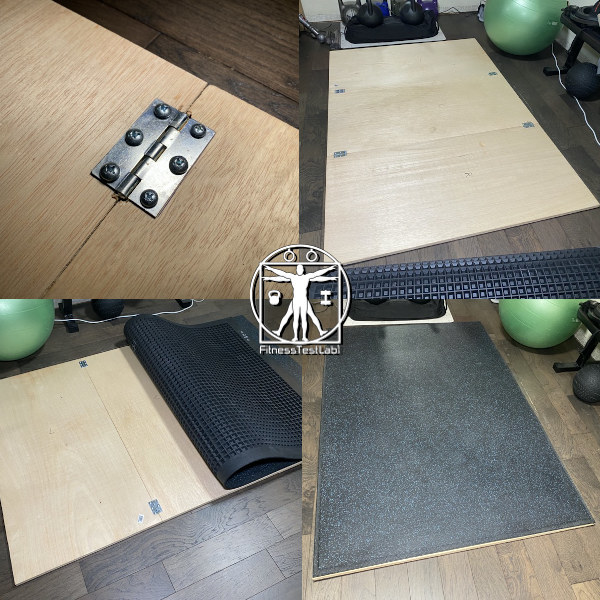
I decided instead to use hinges to connect the plywood sheets. I didn’t want the hinge intersections facing upward though, since they were high enough to cause the foam tiles on top of them to not lay flat.
So, I laid the plywood sheets out again and traced the shape of the hinges on the edges where I planned to connect the sheets. I then use the oscillating multi-tool to cut out enough space on each edge of the plywood for the hinge intersection and I pre-drilled holes for the hinge screws.
Hopefully all this is clear from the picture below.
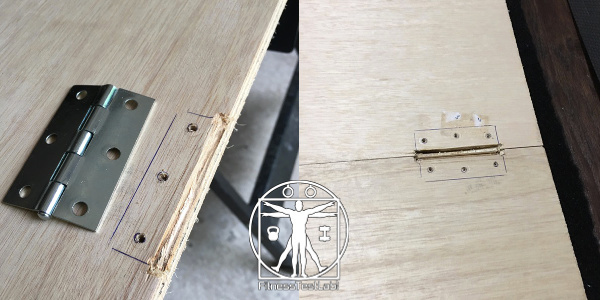
Groovy, baby!
Cutting out grooves in the plywood for the hinges was the hardest part of the the entire project, but the right tools make almost any job easy and this part didn’t take very long with the oscillating multi-tool.
After the cutting and drilling was done, re-assembly went quickly using the Phillips head drill bit and the compact drill to screw in all the hinges.
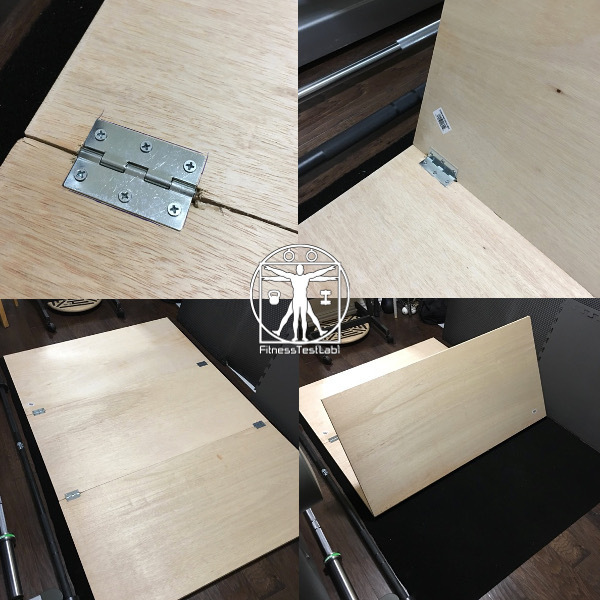
DIY lifting platform, version 2.0
As you can see from the pictures, the hinges keep the plywood sheets together but allow me to flip the ends of the platform up.
This flexibility makes it easy to move the platform around and clean underneath it when necessary.
I do still periodically have to readjust the position of the platform, but it’s much easier to adjust it as one piece rather than three separate pieces.
Final Assembly
After replacing the foam tiles, the platform was done and ready for use!
Version 3.0
A couple of years have passed since I finished version 2.0, and other flaws in the design have become apparent.
I solved the problem of the shifting wood pieces by connecting them with hinges, but my platform still consisted of three independent layers – the carpet, then the wood, then the foam tiles.
Since there was nothing connecting them, I found that they tended to move around a bit during workouts and I was always having to readjust the three layers after working out.
I’m not down with high maintenance stuff, so I went back to the drawing board.
I decided to cut the carpet into individual pieces and glue it to the bottoms of the wood using contact cement.
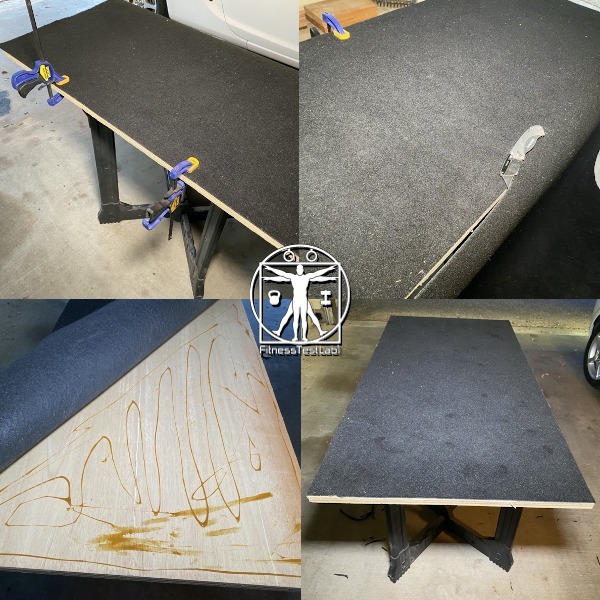
Cut the carpet and glue it to the wood using contact cement
With the carpet glued to the bottom of the wood, I’m combining two layers into one and avoiding the problem of the wood sliding on the carpet.
In retrospect I don’t think contact cement was the right thing to use, but it’s what I had on hand.
If the glue doesn’t hold and I end up having to redo this I’ll likely use Liquid Nails instead.
I also got rid of the interlocking foam tiles since they were getting worn out anyway and bought a shock mat from RubberFlooring Inc to replace them.
This mat is awesome!
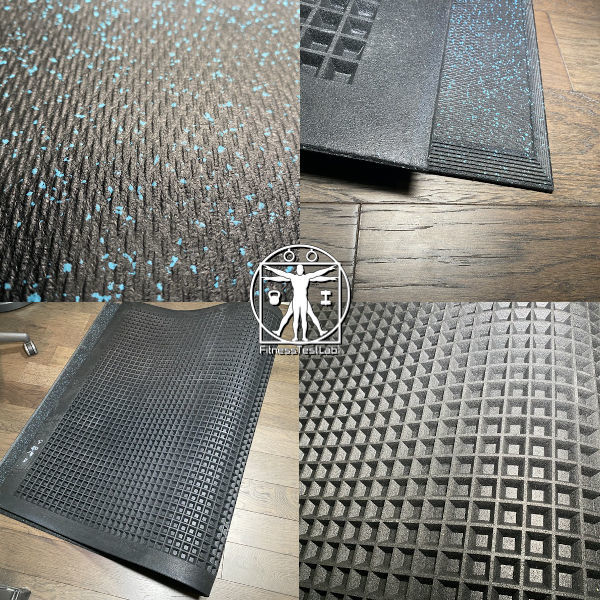
Rubber Shock Mat from RubberFlooring Inc
The shock mat is a 3/4″ thick 4’x’6′ rubber mat with tapered edges and flecks of blue rubber scattered throughout that looks really cool.
The mat backing is a waffle pattern that absorbs vibration and sound from impacts better than a solid rubber mat would.
Speaking of solid rubber mats, I considered getting a cheap horse stall mat from Tractor Supply, but decided against it.
Horse stall mats are made from recycled rubber and they stink pretty bad. This would be okay if my gym was in my garage, but my gym is inside my house.
No way am I letting my house smell like a tire shop!
Reassembling the platform
One side effect of using the lightweight interlocking foam tiles was that much of the force of any drop was absorbed by the wood rather than the foam.
As a result, the screws were starting to come loose from the hinges.
So, while reassembling the platform I beefed up the size of the screws for the hinges from the original #8 wood screws to #12 sheet metal screws.
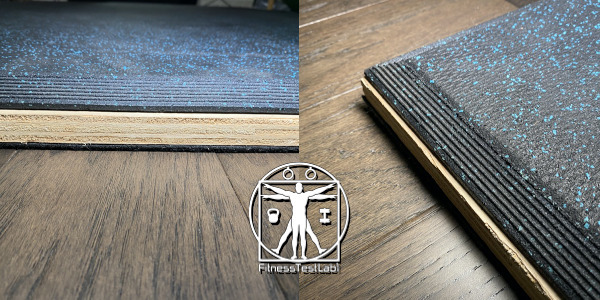
Mat is 4’x6′ with tapered edges
The shock mat is one piece and weighs nearly 100 pounds, so it will absorb most of the force from drops going forward instead of the wood.
I also like that the mat is exactly 4’x6′, so it fits my plywood platform perfectly ?
The total height of the platform is 2″ off the floor in case you’re interested in that detail.
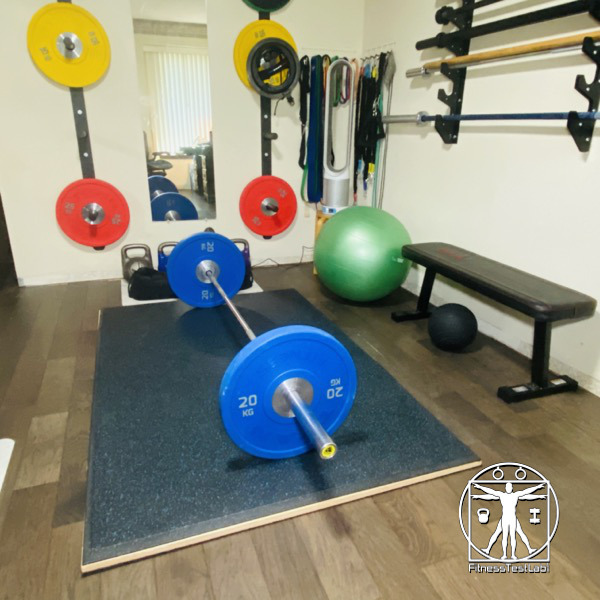
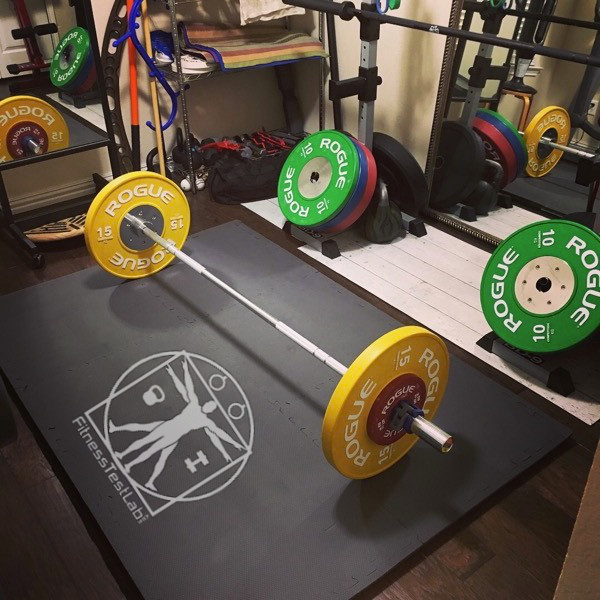
New and improved lifting platform protecting that wood floor ?
After reassembling the platform and placing the shock mat on top, DIY platform version 3.0 was ready for use!
I’m happy to say that it’s working great so far. I’m very pleased with the shock mat and having the carpet glued to the wood means no more adjusting the layers!
Conclusion
This was a fairly easy project to tackle since I already owned an oscillating multi-tool. It probably would have been significantly more challenging if I didn’t have one of those tools handy to cut a groove in the plywood.
Without it, I probably would have had to chisel out the grooves the old fashioned way. Still totally doable, just more of a pain.
Overall, I’m happy with the result. This platform is not going to replace a dedicated Olympic lifting or deadlift platform, but it works just fine for protecting my custom wood floors from the occasional drop from a missed rep.
In any case, I consider it to have been well worth the time, cost, and effort it took to build.
Got any questions I didn’t cover? Sound off in the comments!
About the Author Mario
I'm a software product manager with a full-time job, family, and a desire to stay strong, mobile, and fit. I separate fact from fiction to find the most effective and affordable options for home fitness. If you'd like to build your own home gym, start here.
Popular posts
Session expired
Please log in again. The login page will open in a new tab. After logging in you can close it and return to this page.
Hi Mario, i really enjoyed reading your journey to building a platform especially the way you addressed the problems in an iterative manner. The only thing which seems limiting is that your platform is 6ft by 4ft so would not support a 7ft barbell right? I guess i could add another sheet of plywood to make it 8ft wide, that should be enough! Thank you for sharing your experience.
Hi, thanks for your comments, I’m glad you found my write up helpful. You raise a great point, at 6 feet wide this platform is not ideal for use with a full size 7 foot barbell. However I like your idea of adding another panel, I think that would work just fine. In my case I’m usually using shorty bars with this platform to adjust to my limited space.